Wednesday, September 29, 2010

Ribbon Pumpkins

I totally forgot that I had made these last year.  Can't remember where I got the idea from; I think Mom made some from inspiration from Martha Stewart.  This is another super easy project.  Start with a fake pumpkin, hot glue ribbon in the creases, & top with fringe.


Monday, September 27, 2010

Sewin' It Up!

I was slackin' because my mom was here over the weekend and we were sewin' it up!!  I sewed up NINE skirts, yes nine!  (In additiona to the few that we already made.) The fabric jumps into my basket when I am at Joann's.  And Mom whipped up two jackets.  I am not going to bore you with all of the skirts that I made.  There isn't any easy way to photograph them.  Sorry, I am not going to put on all of them and have Mom take a picture.  LOL  Here is one skirt and one jacket.  Oh how I love this pinks houndstooth!! {Need to get some fabulous buttons.}


Why am I so excited about the skirts?  Because my Mom bought me these super fabulous boots to wear with the skirts.  I just couldn't see spending a pretty penny on the boots AND then spending even more money on skirts .  . . so I found the perfect skirt pattern New Look pattern, # 6147.  The only modification is the super wide elastic.  Elastic is 3" thick. This pattern is VERY EASY!  Check out the other ones I made in this post.

I jazzed up these two dish towels.  For some reason, I like dish towels to hang on my stove.  Guess it is because my Mom always did.  They're a little cheesy with the black lace but since they're for Halloween, I went with it.


Can't have sewing without making any baby burp rags and bibs.  Can't seem to stop making them for other people.


Thursday, September 23, 2010

$9 Fall Decor : Got Wheat?!

This is the easiest & cheapest fall decoration that I have come up with.  Wheat just says "FALL" in my opinion.  Started with a vase that I already had and then added (3) bushels of wheat from the dried naturals section at HL.  Each bushel $6 and then 50% off, which equals $9.  Unwrap and throw it in the vase.  Easy!!


Setting this on the end table in the living room.


Tuesday, September 21, 2010

Fall Porch

I usually don't get out my fall decorations this early. But King has been in & out of town, so more free time for craftin' & decoratin'.  This is only the third year that I have lived in my  "first" house and I really do not have that many fall decorations, except cheesy ones from college which are featured in my trash can.  Of course, you probably already saw the pumpkin topiary which was first on my list to make and the second on my list is a front door fall wreath.  All it took was a grape vine wreath, fall flowers and a mini sign.  I don't really do bows; I went with the mini sign.


Okay, is it just me, or does my door look stupid with a wreath.  
The half moon window really messes me up.  Makes me mad sometimes.

Made a new rocking chair pad and changed out the flowers.
{I suck at growing real flowers.}

This urn sits on the far left side of our house next to the garage door.
I can't show you a picture of our whole house, cause the front porch 
railing needs painting, however, the wood is getting rotten & needs replacing.
 . . . .  it's on that never ending "ToDo" list.


Sunday, September 19, 2010

Pumpkin Topiary

Mom and I have been talking about making pumpkin topiary's for about two years.  Finally, we got around to it this year.  Luckily, we were able to get the pumpkins on sale at Micheal's and I found my copper urn at Lowe's for only $11! Oh how I LOVE this thing! It just screams fall.  It was going to sit on my front porch, but the front of the house gets too much evening such and fades anything that sits out there.  Inside it went; looking as fabulous as ever.


Thursday, September 16, 2010

Go Cougars!

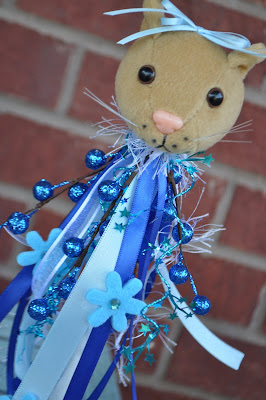
It's that time of year again, FOOTBALL season! The only sport I actually like and kinda get into (as you can tell I am an Aggie fanatic). Of course, Micheal's, HL and every other craft place has homecoming stuff slapping you in the face when you walk in. At Micheal's the other day, I saw stuffed mascot heads . . . cats, bears, and ect. I WANTED one! Have you seen them?! Such a novel idea! Micheal's was selling these decorated heads on a stick for $24! Naturally, I walked out with an undecorated head and a dowel rod. (Haven't seen them at any other stores.)

This one is decorated for a coworker's daughter in honor of her school colors.  I am thrilled that it turned out so stinkin' cute!


Make you own:


Gather your supplies.  Spray paint the dowel rod, or you can cover with ribbon.  Be sure to check out other areas of the store, like the Christmas department, I got the blue glittered berries and the sparkly wire stuff from that department.  No need to spend a ton of money in the homecoming department.  It doesn't take as much ribbon as you might think, so don't go crazy buy ribbon . . .  I do this ALL the time!


Hot glue all of your ribbon, berries, and ect to the end of the dowel rod.  T(I don't have a picture.)  The stuffed head has some thread that for breaking open to create the hole, but it isn't near big enough; cut the fur for an opening.  Do a trial run with no glue to make sure the ribbon on the dowel rod will fit into the head.  I shot hot glue into the hole.  The hot glue seems to hold up pretty well.  I had some extra blue flowers laying around and glued those on to the ribbon too.  I still might add a name.  Don't forget the hair bow. :)


Sunday, September 12, 2010

Baby Tutorials

BABY SHOWER CORSAGE
I want to throw myself a baby shower and I'm not even pregnant! {j/k} I LOVE this baby shower corsage that I made.  I would like to think that I thought of it on my own, which I did, but I am sure someone else has made one similar. 

BABY SHOWER CORSAGE DIRECTIONS:  (takes about 10 mins.)
-Started with a dark pink gerber daisy and cut out the center "button" (click here to see a pic)  Used a gerber daisy from the floral aisle.
-Hot glued the light pink mum onto the dark pink daisy.  I found this light pink mum at HL.
-Cut the brim off one side of the pacifier so it will tuck nicely into the light pink mum.  Glue.
-Glue in a few tiny pink flowers and add a tiny bow; you're done!

BABY BIBS 
Baby bibs are super easy to make even for the beginner sewer.  The best part about making them is that they hardly take any fabric at all.


BABY BIB DIRECTIONS:
I found the pattern over here, along with some great instructions.  They didn't tell you how to add the initial.  I used fusible web on my fabric and sewed along the edges before sewing the front and back pieces of the bib together.  If you don't know how to use fusible web, then you need to start! It is the greatest thing ever!  You can find it in the interfacing section of your craft/sewing store.  It also comes on a roll.  When placed between two pieces of fabric, the melting action of the web causes it to fuse the fabrics together.  It always comes with instructions that are super easy.

BABY BURP RAGS
I can't stop making these burp rags!! Oh they are so easy and expensive to make! I love making them!! They make the cutest gifts!


During my giveaway several people asked for a burp rag tutorial.  Here are some quick and easy instructions and some tips on making them.  Ahh, I totally stink at giving instructions so am hoping too many people do not get confused.

BABY BURP RAG TUTORIAL:
-Before you begin be sure to PRE-WASH your burp rags! This is a must!  They shrink ALOT!
-Be sure the realize that the burp rag isn't 100% square.
-Layout your burp rag on the ironing board, getting it as square as you can.  Lay fabric on top of the burp rag with the right side up, fold under edges of fabric while matching it to the size of the burp rag, iron and pin.
-As you can see, I have two pieces of fabric.  The bottom piece of fabric is about 4" thick.
-Once you have ironed under all the raw edges, and pinned the fabric to the burp rag, then you can top stitch the fabric onto the rag.
-When you are folding under the edges of the fabric, you might realize that you aren't folding the fabric exactly straight, this is because the burp rag isn't 100% straight.
-Be sure the bobbin color is white and the top thread matches your fabric.
-Once everything is sewn into place, you can then sew on a piece of ribbon where the two pieces of fabric meet.
-Before sewing on the ribbon, I use fusible tape to hold down the ribbon so it doesn't move while sewing.  Follow the instruction on the fusible tape.
-When adhering the ribbon to the fusible tape, be sure to use a pressing cloth to protect the ribbon, the ribbon melts very easy and sometimes the images on the ribbon can melt too.
-And that is it! I usually make mine in a set of three and tie with a pretty ribbon.

If you get confused or have any questions, email me, and I will be glad to help.


Friday, September 10, 2010

Mrs. Rooster's Birthday

Before going out of town I celebrated Mrs. Rooster's birthday a few days early by decorating her cubicle and making some super snazzy cupcakes; kinda proud of them with the fat icing. It's always so much fun throwing mini parties for people!

The pictures aren't telling the whole color truth! 
The purple items didn't photograph well. :(
(I promise, everything matched nicely.)

Thank goodness she takes her laptop home every night, gave me more space to decorate.


Wednesday, September 8, 2010

Super Fabulous Gift Bags

I am back from my vacation! Yay! I hit the ground running on my return and haven't even had a chance to upload the pictures.  Of course, no time for crafting . . .  workin' overtime, bible study started back up, and I have a mountain of laundry to do.    

Here are some super EASY gift bags that I jazzed up for some thank you gifts awhile back.  Giving gifts in jazzy packages is a must, especially since the gift was store bought. These are regular 'ol colored lunch bags that got a face lift with paper & embellishments; cut the top with wavy edge scissors.  The recipients are always thrilled about the bag, probably because they are thinking about how they are going to re-use it! LOL  "You Rock" is fitting for any person and any occasion. 

Just make sure your gift is as snazzy as the bag!


Thursday, September 2, 2010

Snazzy Headbands

Headbands seem to be the new "IN" thing right now.  Of course, I wanted to make a few for myself and some friends.  This is such a super EASY project.  Whipping these up only took about 30 minutes.  Using my easy flower technique made them super cheap, especially since I got the headbands at the DT for 4/$1.


I even made this snazzy broach/pin thing-a-ma-jig.  It will look great with that blue skirt from the last post.  Still have some fabric for a matching top.  Can't wait to wear it!


Related Posts with Thumbnails