Tuesday, November 30, 2010

Treasure Hunting with Mrs. Rooster

Hello everyone!!
Sorry it has been so long since my last post. I have been terribly busy with many large projects that I plan on posting and sharing with you over the next several weeks. Girl Scouts Honor!

My most recent find was completely unexpected and totally fit the bill for my office. Tip 1. when treasure hunting you must always be prepared to find a bargain when you least expect it. So always keep some cash on hand. ($10) However, don't purchase anything unless you have a use for it because it then it would not be a bargain!

I was coming home early from a completely STRESSFUL day at work. Just kidding I don't really have stressful days in my job! But I did totally take off early. And there to my surprise across the street from my house, on a beautiful Thursday afternoon was a "YARD SALE"! Yippee I thought to myself. I totally strolled through the piles of great things and found this old, rustic, french country chair that fit the profile to a "T" for my office chair. I totally had to have it. So I paid $5 bucks and carried it all the way home - across the street!


As you can tell from the picture this chair was not "tushy" ready. I had all the supplies at my house for this project. I left the paint mostly the way it was because I really liked the age of the chair and I didn't want to take that away from it. It gives it ummm... character. I took a 1 inch piece of plywood from the garage and cut it to fit the chair. I took some 5 inch foam and cut it to the size of the base.


I had some left over remnants of my drapery fabric for my office. So I used it to wrap the cushion. With a few swift pushes of my handy dandy staple gun this projects was a wrap in like 5 minutes. It looks so good in my office and was a great find. For under $5 I got exactly what I was needing in my office space. A chair for Haley to come sit in and talk crafts with me. I would love to hear about your fabulous finds..so please share with us and also Happy Treasure Hunting!


Mrs. Rooster

Wednesday, November 24, 2010

Taco Soup! Yummy!!

Got guest in town?! Make Taco Soup!!
I am not sure where my Mom came across this recipe but I has to be the most delish taco soup recipe EVER! Along with the pumpkin muffins,  I could eat this for just about every meal of the day!  This recipe is super fast (literally 15 mins!) and CHEAP! My pantry is always stocked with taco soup ingredients; great for fall and winter!  I frequently end up freezing half of it because King is often out of town.  Full recipe & instructions below.


{I just realized that I misspelled tortilla . ..  too lazy to change.}

Taco Soup:
Ingredients
1 can corn
2 cans of black beans
1 can pinto beans (I like the ones with the japs already in them.)
1 can original Rotel tomatoes
1 small can of tomato sauce
1 pkg of Taco Bell seasoning mix (I think, Taco Bell's brand is the best.)
1/2 to whole diced onion depending on your preference.  (I use a whole one.)
1/2 - 3/4 bunch of cilantro and some for topping
2-3 chicken breast (depending on size and how "meaty" you like it.  I use 2 large breasts.)
1 diced jalapeno (Be careful cause you don't want it to hot! I don't use an additional jap if I get the pinto beans that already have them.)  
Grated cheese & crushed tortilla chips for topping.

Directions
Cut up chicken into bite size pieces and cook, stir in diced onion. (I cook chicken w/ onions directly in the soup pot with a little EVOO)  Mix all canned items into pot with chicken.  Do not drain canned items.  Stir in seasoning mix, cilantro, and diced jalapeno.  Add 1 1/2 cans of water.  Let simmer 10 mins.  Serve in bowls topped with crushed tortilla chips, cilantro and grated cheese.

Serves 6


Monday, November 22, 2010

Baby Shower Favors: Mini Bottles

Do you "have" to hand out favors at a baby shower? Heck, I don't know . . . but I decided to make some anyway.  I can't resists these mini bottles and filling them with coordinating candy. They turn out so stinkin' cute and hardly take any effort {And people with think I am the best hostess EVER! lol}.  I purchased a dozen of these at Micheal's, filled with coordinating M&M's from Wal-Mart, and added a tag cut out from the Cricut.  

Don't worry, there will be more shower decorations coming up. 


Saturday, November 20, 2010

Door Knob Decor

I was pondering on some ideas for some super cheap Christmas gifts. Cheap to make AND cheap to mail. I came across my inspiration when I was in Montana and purchased a door knob decoration that was strictly for decoration purposes.  It doesn't have the words "Do Not Disturb" on it. LOL It has a nice decorative flower.

Duh! It came to me . . . HL sells unfinished door knob decorations for only $1!  I got to work with some scrapbooking paper, a little Modge Podge and decided to make them personalized.  My second attempt at MP and I am THRILLED!! {MP and I have had issues in the past.}  I cut out the letters with my Cricut & added some embellishments with a little ribbon . ..  BAM! I was done!  This was such a quick, easy, cheap & super fabulous project costing less than $2 to mail.


Thursday, November 18, 2010

Book Wreath

I am little behind when it came to the book wreath rage  . . . . it seems everyone was making them when I first started bloggin' and I never got a chance to make one, until now.  I absolutely think the idea of the book wreath is awesome; however, I don't even know why I made it!  Wishful thinking?! It totally doesn't even go with my decor!! It is practically white and I do not have anything in my house that is white, nor do I like that light colored cottage-y, vintage-y look that is popular (Gasp! I know I really did say that!! It's a great look, just not for my house.)  So, the book wreath ended up in the laundry area/ garage that no one sees.  I guess it's okay for now . . . thinking about spray painting it for a different holiday or season . . . . . .

I am happy with the way it turned out and I didn't follow one particular tutorial . . . but it's just not for me.


Tuesday, November 16, 2010

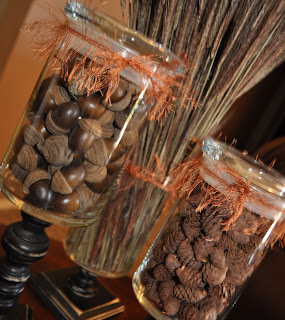
Fall Apothecary Jars

I am so stoked that I made these apothecary jars for Halloween (mini tutorial too!). Now I have them filled with fall goodies; I love having decor that is adaptable to any occasion.  At the time, I didn't even know what to put in them for fall, but with a little inspiration from all of you . . . I figured it out.  I even decided not to put  a lid on the wheat because I like the wispy way it looks.  The apothecary jars are perfect for our end table in the living room.  I am totally diggin' on those acorns!


Sunday, November 14, 2010

SCARF WINNER

The winner of the scarf is #24.
The Paisley Abbey said...
I love to see homemade gift ideas. :) Courtney ThePaisleyAbbey@gmail.com

A coincidence that Courtney asked about gift ideas because I was thinking of putting a post together with gift ideas.

Fall Banner with Chipboard

I am obsessed with banners!! I love them so freakin' much!! When fall came around I knew I wanted to make one for the big mirror in the living room.  I love the rectangle look with the triangle cut out to give a pendant look . . . is that the best way to describe this?  I decided on using chipboard letters to give the banner some dimension.  Boy am I sure glad that I did!! The chipboard really makes the whole banner look fabulous.  Used a little spray paint and Modge Podge on the chipboard letters that were hot glued to the paper. 


Thursday, November 11, 2010

Baby Shower Corsages Again . . .


Here are the two baby shower corsages that I whipped up for the two showers.  . . yet again . . . I am kinda getting tired of them, but I really haven't seen any other ideas for something like this.  Besides, I do NOT want it to look like the Mom To Be is going to a high school homecoming game.  Anyone got any other original ideas?  Maybe I could change up the pacifier in the center? 


Here is the tutorial.


Wednesday, November 10, 2010

Burlap Banner

I haven't really bought into the burlap craze that everyone else seems to love.  I know, I am different.  I am really not a fan of burlap because I think it's kinda hillbilly & cheap-o looking.

However, the texture of burlap for the fall season is great. {and PEER PRESSURE! made me want to give it a try!} . .  . so I walked my Cheap Hillbilly A** up to the cutting counter at Joanns's and had some cut.

Here is what I came up with .  . . a burlap "thanks" banner for my office  I cut out burlap triangles and cloth triangles, sewed the two together, so the burlap wouldn't fray and then I stenciled on the letters using my Cricut to cut stencils.  Hot glued on some fringy-yarn for hanging and BAM! I was done in less than an hour.


Tuesday, November 9, 2010

Baby Shower Invites: Pink and Brown

Mrs. Rooster and I have already completed one set of baby invites for our fall showers and I totally forgot to get some pics of them {Don't worry I will try to get a picture!!}.  Here is the second round of baby shower invites for my long time BFF Mrs. M.  I am more than thrilled about her pregnancy!!

I layered up the paper, added some ribbon, cut out a scalloped circle with the Cricut & assembled.  Okay so it wasn't that easy . . .  there was 50 of them, but Mrs. Rooster and I got this invitation thing DOWN! {lol}  I really like adding the "you're invited" stamp to the outside of the envelope so people don't leave this particular piece of mail laying around .  . . but that will not happen!! They were in sent in pink envelopes!

I REALLY wish they would have photographed better . . . the pink really isn't washed out.


Monday, November 8, 2010

SCARF GIVEAWAY!

I am such a slacker . . .finally have my giveaway item finished! A FABULOUS ANIMAL PRINT VELBOA SCARF! Animal print is still all the rage this year for winter. An animal print scarf is a great way to accessorize your winter outfit.  I had full intentions of having King take a picture of me with this scarf on but yeah . . .  that isn't happening at 11pm while he is sleeping and I really want to get this giveaway going!

I will be posting scarf tutorial in a week or so .  . . needing to make a few more for some Christmas gifts.


Giveaway ends on Saturday night!


Saturday, November 6, 2010

Still Making Burp Rags

Burp rags WILL NOT go away! After this last batch I am probably up to 100 or so.  I know you thinking that can't be true but I assure you it is . . . . I've blogged about it here, here, here, here, here, here, here, and here.  Some of them aren't even shown on my blog.  This last order was for two dozen.  Whew! That was quite a bit  .  . . I was starting to feel like a factory worker.  My attempt at a tutorial is here.  I cover the whole front with fabric, where as some people cover just the middle front section  . .  . whatever you prefer, they still turn out super cute.

I promise, you will see more of these.  Over the past three years all of my friends have added "MRS" to their names.  (If I was blogging back then, you would have barfed at all the wedding posts! I have been MOH FIVE times!  I must be a super fabulous friend!) Now we are on to babies and more babies! They need to slow down!! King and I aren't even married yet!  Two MORE baby showers coming up!

If I am going to make baby stuff . . .  I gotta support my Aggies! 
{Okay, and the "other" team.  We need the other team for a good rivalry!  Whoop!}
 

Wednesday, November 3, 2010

Pumpkin Muffins

November calls for pumpkins and comfort food.  Put the two together to get pumpkin muffins!  I am pretty sure that I could eat pumpkin muffins for every meal of the day. {Sometimes I do! Especially when King is out of town and I don't feel like cooking for one person.}  Recipe below.


Pumpkin Muffins:
Ingredients
1 1/2 cups all purpose flour (wheat flour works well too)
1 tsp. cinnamon
1 tsp. baking soda
1 tsp. baking powder
1 tsp. of allspice
1 1/4 cups of sugar (Splenda make them too sweet, so I use half of each)
2 lightly beaten eggs
1/2 cup milk
1 cup pumpkin puree (NOT pie mix)

Preheat oven to 350 degrees.  Mix dry ingredients.  In another bowl, beat the oil, eggs and milk.  Stir in pumpkin puree.  Combine the flour mixture into the pumpkin mixture.   Bake for 20 mins.  Place on baking rack to cool.

{I usually double the recipe and I never mix in two separate bowls.  Does anyone really do this?! Seems like a waste of time and I can't seem to tell a difference.  I combine all the ingredients at once!} 

While I am talking about baking . . .  let me show off my "baking center"  I purchased baskets at the dollar store to help organize baking goods and seasonings.


Monday, November 1, 2010

Hello Fall!

The Halloween decor is put away and time to get out one more piece of fall decor .  . . my fall arrangement that sits on my table.  Last fall, my BFF, Mrs. S, got married and I did about 15 floral centerpieces for her Wedding Eve Party.  After the party, I took all 15 of the centerpieces and placed them in one big vase.  I am pretty sure this is one of the best arrangements that I have done.  The droopy flowers and feather pieces are so fabulous! King totally hates it because it is so big but everything is bigger in Texas!


Related Posts with Thumbnails